
Introduction
Front
{{section_header}}{{section.name}}{{/section_header}}
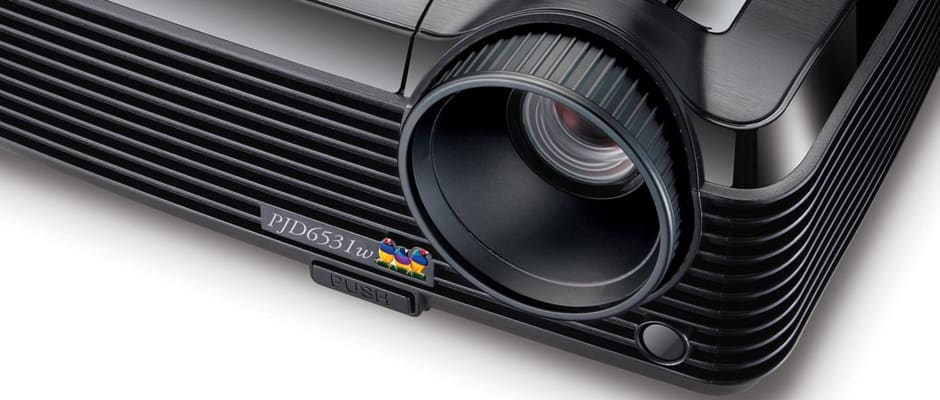
The PJD6531w is a DLP projector with WXGA resolution and a claimed light output of 3200 lumens. It supports 120Hz inputs, making it 3D ready. At 5.9lb, the projector is rather heavy, but it does come with a handy carrying case.
Back
{{section_header}}{{section.name}}{{/section_header}}
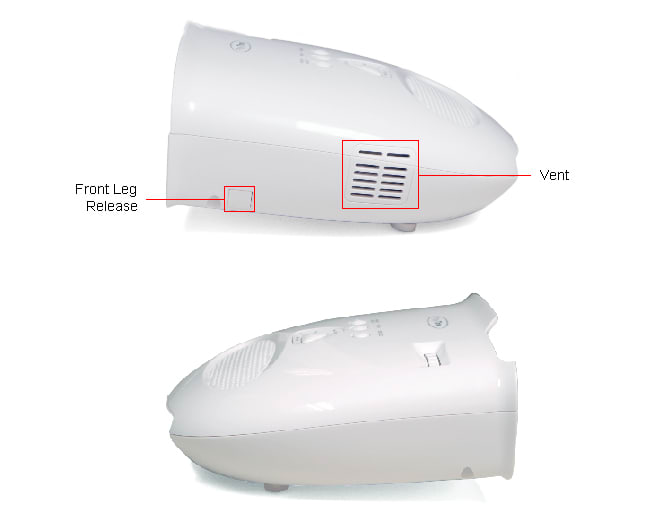
Sides
{{section_header}}{{section.name}}{{/section_header}}
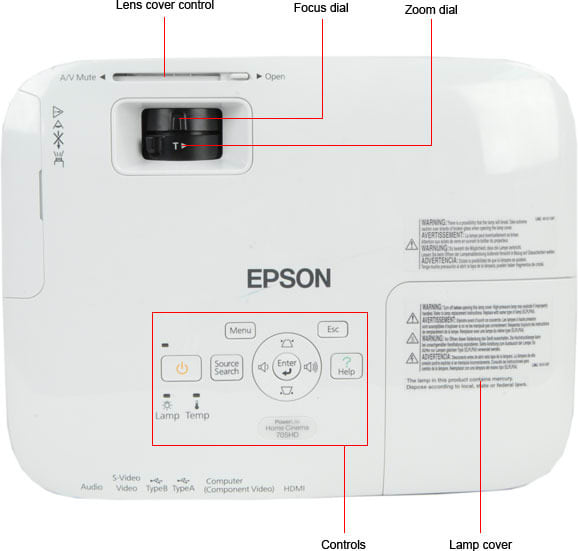
Top/Bottom
{{section_header}}{{section.name}}{{/section_header}}
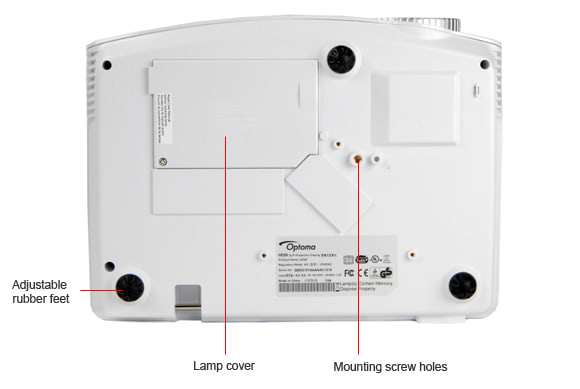
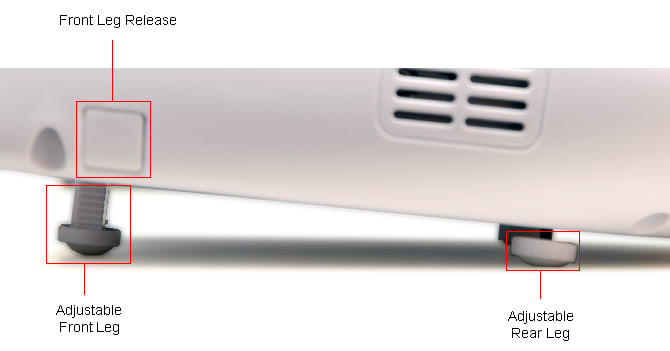
Stand/Mount
{{section_header}}{{section.name}}{{/section_header}}
A small, extending leg at the front of the projector and two on the back allow the angle to be adjusted. Three screw holes on the bottom of the body allow the projector to be wall or ceiling mounted.
Lamp
Remote Control Tour
{{section_header}}{{section.name}}{{/section_header}}
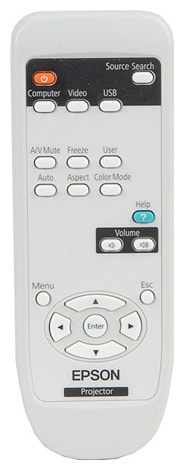
The remote control is a small, simple device that fits well into the hand.
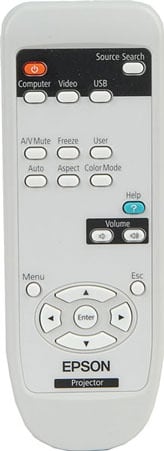
The small remote control of the 705HD
In the Box
{{section_header}}{{section.name}}{{/section_header}}
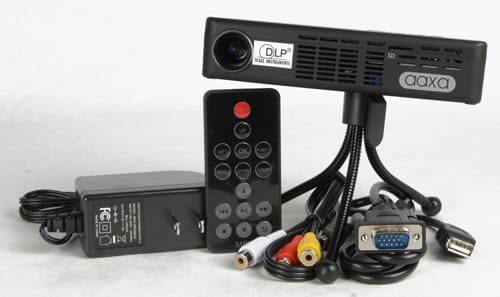
In addition to the projector, you'll get the following items:
* Remote control
• Power cable
• VGA cable
• Carrying case
• 2x CDs (Network control software and manual)
We are pleased to see the inclusion of a VGA cable; most projectors come with no cables.
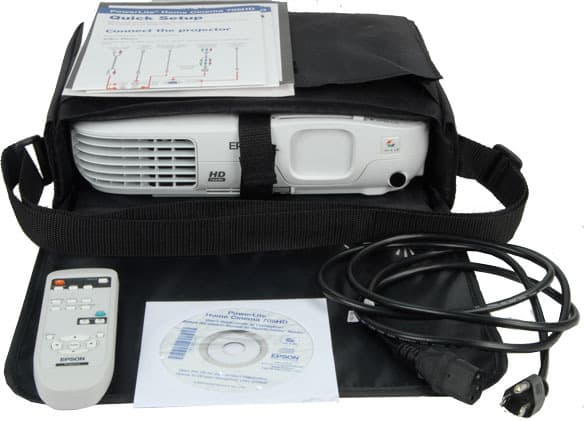
The 705HD comes with a carrying case, manuals, power cable and remote
Portability
{{section_header}}{{section.name}}{{/section_header}}
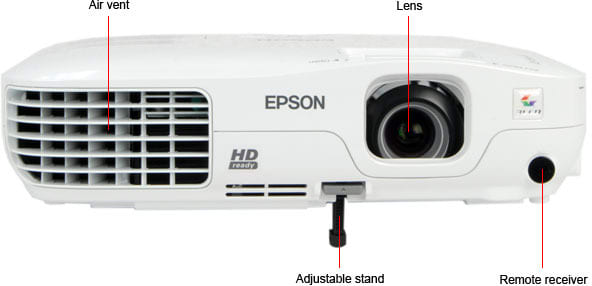
The PJD6531w is a little on the large side to be easily portable: it will definitely take more suitcase space than, say, the Epson 705HD.
We measured the weight of the projector, carrying case and the required cables at 6.4 pounds, which isn't too much.
{{product.raw_scores['Portability']}}
Setup Assistance
{{section_header}}{{section.name}}{{/section_header}}
The setup process of this projector is straightforward: plug it in, wire it up, turn it on, select the source and set the keystone. Unlike some other projectors, there is no automatic keystone setting to sense and compensate for the angle of the projector: you have to set that manually. This projector provides up to 40° of keystone projection, up and down.
{{product.raw_scores['Setup']}}
Aesthetics
{{section_header}}{{section.name}}{{/section_header}}
The design of the PJD6531w is functional, but it has a nice, clean look to it. One nice touch is the attached lens cap, which helps protect the front element of the lens when it is not in use. Unusually, this projector does not include any air filters or other way to keep dust out. Instead,the air vent is wide open, providing a view of the internals of the projector. The lamp enclosure and optical path are sealed, though, so dust getting in should not be an issue.
Peak Brightness
{{section_header}}{{section.name}}{{/section_header}}
The PJD6531w includes a range of different image modes, but we found the brightest to be the appropriately named Brightest mode, which we measured as outputting an impressive 3177 lumens, almost spot on to the rated 3200 lumens. The movie mode decreased the brightness somewhat, with the output dropping to just over 2000 lumens. Running the projector in the ECO mode also dropped the light level (down to about 2300 lumens in the Brightest mode), but did significantly reduce the fan noise and the power usage.
In our calibrated mode (which is our recommended settings for movie watching), we found that the brightness was reduced significantly, with the lumens falling to 1074. The main reason for this significant drop was that we turned off the BrilliantColor setting, as this adversely affects the color accuracy of the projector. While that is not an issue for business use, it is a problem for watching TV and movies.
On our test screen, this 3177 lumens translated into a screen brightness of 513 Cd/m2 (Candelas per square meter), which is as bright as a decent HDTV. The brightness in our calibrated mode for watching movies was significantly reduced, though: we measured that at 172 Candelas per square meter.
Tunnel Contrast
{{section_header}}{{section.name}}{{/section_header}}
The brightest whites that a projector can produce tell only part of the story: you also need deep blacks on the screen. In this test, we look at how deep the blacks are, and how well they hold up when they are on-screen with a lot of white. To do this, we measure the level of an area of black in the middle of the screen, and surround it with an increasing amount of white. With a perfect projector, the black level would remain constant. In practice (and with this projector), it doesn't; the level of the blacks climbs slightly as the amount of white on screen increases because light bounces around inside the projectors optics. That seems to be an issue with this projector: although the blacks are nice and deep when the screen is mostly black, they get significantly lighter when there is a lot of white on the screen.
Uniformity
{{section_header}}{{section.name}}{{/section_header}}
A good projector produces a clean, uniform picture without splotches of light or darker areas. We didn't see any issues with the PJD6531w's uniformity. Although the light level varies across the screen (see our measurements below, with the projector in Brightest mode), it does so in a smooth, uniform fashion that produces a clean, attractive look. The chart below shows the measured lux values on our test screen (an 80-inch model), and the photos below show how a white and black screen look. Note that these have been enhanced to show the differences: the images you would see on the screen would look a lot more uniform than these.
We found that the PJD6531w produced clean, smooth images with only minor uniformity issues. White screens get a little dim in the far corners, but this was only really noticeable on an all-white display.
Greyscale Gamma
{{section_header}}{{section.name}}{{/section_header}}
We measured the greyscale gamma (the slope of the curve which determines how quickly black transforms into white) at 2.19, right inside the ideal of 2.1 to 2.2 that we look for.
Greyscale Gamma
Color Temperature
{{section_header}}{{section.name}}{{/section_header}}
Our color temperature test looks at the consistency of the whites: do they stay at the same color temperature as their brightness decreases towards black? The basic answer for this projector is yes: we saw only very minor (and pretty much unnoticeable) changes in color temperature, meaning that this projector produces very consistent whites.
Color Temperature
RGB Curves
{{section_header}}{{section.name}}{{/section_header}}
We were also impressed with the color performance of this projector: we saw a very smooth, accurate response to changes in the intensity of the red, green and blue primary colors, meaning that this projector can accurately reproduce subtle changes in colors on the screen. This makes for smooth gradations of color, such as skies and shadows.
RGB Curves
Color Gamut
{{section_header}}{{section.name}}{{/section_header}}
The only major issue that we saw on this projector was an inaccurate color gamut, which is the range of colors that a projector can reproduce. A standard high definition TV signal should contain colors within a certain gamut defined in a standard called Rec.709, so a projector should produce the same range. The PJD6531w didn't quite manage this: reds and greens were a little off, but the blue was very inaccurate, meaning that the blues in images are going to look a lot more violet than the originals.
{{image_chart title="Color Gamut", attachment="Color Gamut Graph"}}
Below are the color coordinates of the Rec.709 standard, our measurements, and the difference between the two.
Color Gamut
Motion Smoothness
{{section_header}}{{section.name}}{{/section_header}}
The PJD6531w can display images at up to 120Hz (that is, 120 times a second), but we saw no evidence that it uses this speed to smooth the motion of video in the same way that many HDTVs do. Instead, the projector simply shows the images as they are received, without any of the motion processing or motion compensation that standard HDTVs use. That's not to say that the motion on this projector was bad: we saw cleanly reproduced motion that looked smooth and attractive.
Motion Artifacting
{{section_header}}{{section.name}}{{/section_header}}
One thing that we did see was the DLP rainbow effect, where some color fringing can be seen on fast moving objects. This is caused by the way that DLP projectors like this create colors by showing images in different colors (usually red, green, blue and then white) faster than the eye can distinguish them. You eye them combines these images to create the full color experience, except sometimes the images change between the different color images, causing a color fringe. With fast moving objects, this can give a rainbow effect as the color fringe will change, depending on which color was being shown at the time it changed. The amount of the rainbow effect you see depends on both the speed of movement and how sensitive you are to it, but we found this to be less prominent on this than on some projectors.
3:2 Pulldown & 24fps
{{section_header}}{{section.name}}{{/section_header}}
The PJD6531w does not support 3:2 pulldown processing, but it can display 24fps (frames per second) signals.
Resolution Scaling
{{section_header}}{{section.name}}{{/section_header}}
The PJD6531w can deal with any image from a standard definition right up to a 1080p high definition signal, but all images are scaled to fit the WXGA (1200 by 800 pixel) native resolution of the projector. To test how well it handled these, we looked at a number of test screens at several different video resolutions.
480p
These relatively low resolution images are upscaled by the projector to fit most of the screen. As a consequence, they do look rather blocky, but the details of the image are still well reproduced.
720p
Like most WXGA projectors, the PJD6531w letterboxes 720p signals, adding a black strip at the top and bottom that effectively turns the 16:10 aspect ratio into a 16:9 one. However, this also means that it can reproduce every pixel of a 720p signal, and these images looked clean and sharp. If you are connecting this projector to a device such as a Blu-ray player or cable box, this would be the best option to run it at.
1080i & 1080p
Because the PJD6531w doesn't have the resolution to show every pixel of a 1080 video signal (which as 1920 by 1080 pixels), it downscales the image to the same size as a 720p image, showing 1200 by 760 pixels. This downscaling gives images a somewhat soft appearance and looses some details. We also did not see any difference between feeding the projector a 1080i (with 30 interlaced frames a second) image or a 1080p one, which contains 60 full frames a second.
3D Readiness
{{section_header}}{{section.name}}{{/section_header}}
The PJD6531w is a 3D ready projector, which means it can display the 120Hz signal that a 3D image needs, but it does not support 3D out of the box. To use this projector as a 3D display, you will need to add extra hardware in the form of either Texas Instruments' own 3D DLP system, or the NVidia 3D Vision system. Both of these include an IR transmitter and use active shutter glasses (which must be purchased separately), as well as an appropriate device to produce the 3D content.
Throw
{{section_header}}{{section.name}}{{/section_header}}
One of the fundamental properties of a video projector is throw, which is the distance that the projector has to be from the screen to produce a particular sized image. The smaller the angle that it projects with, the further it has to be from the screen. On projectors like the PJD6531w, this is a range of distances because the zoom lens provides some flexibility. We found that this projector had a decent throw range: to fill an 80-inch diagonal screen, it has to be between 9 feet 8 inches and 10 feet 3 inches, which provides some degree of flexibility in mounting the projector.
Screen Brightness
{{section_header}}{{section.name}}{{/section_header}}
The further the projector is placed away from the screen, the bigger the image is going to be. But it is also going to be dimmer, which will be an issue if there is more than a slight amount of ambient light in the room you are viewing in. While this projector could produce a nice bright image on a 60-inch screen, it is going to be a lot dimmer on a bigger screen. If you were to try and use this projector with a 140-inch screen, you would get a very dim image, as the numbers below show.
The second chart shows our recommendations for the maximum size of screen that could be used in a variety of lighting conditions, such as a darkened room or a well-lit conference room. Basically, this projector could be used on a smaller screen in well-lit conditions, but with a screen bigger than 80 inches or so, it would be too dim to be easily visible in moderate lighting.
While you might be prepared to put up with a rather dim image in a very dark room, it is not going to work in a well lit one: the ambient light will drown out the image. That is what we show below; how the image looks projected onto our 80-inch test screen with a number of different levels of ambient light. As you can see, the image looks okay at the lower levels, but it starts to fade and is almost unviewable at the highest level, which is 1500 lux, about what you would get in a typical office or meeting room.
Screen Materials
{{section_header}}{{section.name}}{{/section_header}}
You don't always get the luxury of being able to project onto a nice screen; sometimes you have to use whatever is on the walls. So, we test the performance of the projector shining onto four materials: two painted walls (one grey, one cream), wood paneling and a glossy dry erase whiteboard. We found that the ViewSonic did a decent job here: the image was bright enough in moderate light to be visible on the wood paneling and the different paints. The projector also includes a three modes designed to adapt for different materials (whiteboard, greenboard and blackboard), and we found these to be effective with the appropriate materials. There is no way, though, to easily adapt the image color settings to compensate for a non-white surface.
Optical Issues
{{section_header}}{{section.name}}{{/section_header}}
We found that the zoom lens of the PJD6531w did not introduce many issues: the projected pixels were sharp in the center and edges of the image across the zoom range. There was a very slight softness in the far corners of the image with the lens at is widest setting, but this wasn't a major issue. The keystone correction did introduce some issues, though: there was a lot of stair-stepping on straight lines that was rather visible even at the smaller keystone settings.
Video Processing
{{section_header}}{{section.name}}{{/section_header}}
The PJD6531w offers a number of features designed to improve the video quality. We found that the only useful one of these is the BrilliantColor, which can boost the brightness of the whites, but at the cost of color accuracy.
Formats
{{section_header}}{{section.name}}{{/section_header}}
The PJD6531w is a WXGA projector, which means it has a native resolution of 1200 by 800 pixels. It can display images at different resolutions, though, ranging from standard definition signals (from both analog and digital sources) right up to 1080p high definition signals. It can also work with 24 frames per second signals, as well as 25 and 50 frames per second signals generated by devices that use the PAL video system used in Europe.
Calibration
{{section_header}}{{section.name}}{{/section_header}}
There is no one video mode or group of settings that is good for all of the situations that a video projector can be used in. So, we pick one: watching movies in a darkened room. The settings below are our recommended starting points for this, and the settings that we use in our color tests. Feel free to use these as a starting point for your own personal calibration, but remember that the best calibration is the one that produces the best image quality for your own situation.
We disabled the BrightColor feature that this projector offers for our calibrated settings: it has been our experience that this can often cause serious color inaccuracies, especially with skin tones and brighter colors. This feature can work well with presentations and other content that includes flat colors, though.
Video Modes
{{section_header}}{{section.name}}{{/section_header}}
The PJD6531w offers a number of preset image modes designed for various different situations. These are described below.
Ergonomics & Durability
{{section_header}}{{section.name}}{{/section_header}}
The remote that comes with the PJD6531w is small and thin, but it has decent sized buttons (26 in all) and fits into the hand well. An indentation on the back of the body makes for a firm hold.
Button Layout & Use
{{section_header}}{{section.name}}{{/section_header}}
The remote fits well into either the left or right hand, with the thumb falling naturally over the directional controls and menu button. It is also easy for the thumb to reach the other important controls, though; the keystone, magnify and volume buttons are all in easy reach.
The on-screen menu is accessed by pressing the menu button, and a group of buttons at the bottom of the remote provide access to a number of other features, such as the color mode, blanking the projector and the mouse mode, where the directional buttons emulate a mouse.
One unusual (and useful) feature is the built-in laser pointer, which is activated by the orange button at the top of the remote. This could be useful if you are making a presentation and want to highlight an important point, or if you are watching a boring movie and want to amuse yourself by distracting the cat and sending it racing across the room in pursuit of the red dot.
Programming & Flexibility
{{section_header}}{{section.name}}{{/section_header}}
This remote cannot be programmed to emulate other remotes and control other devices: it is purely for controlling this projector.
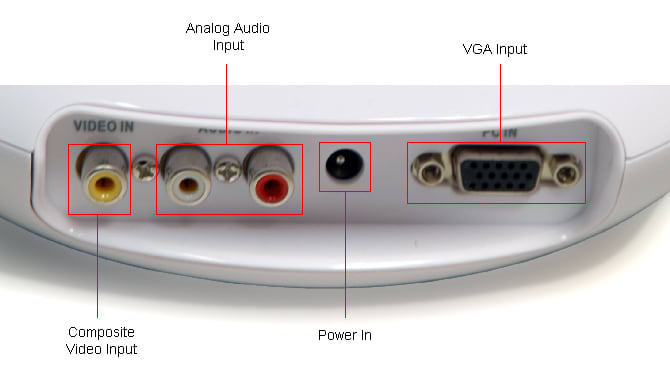
Input Ports
{{section_header}}{{section.name}}{{/section_header}}
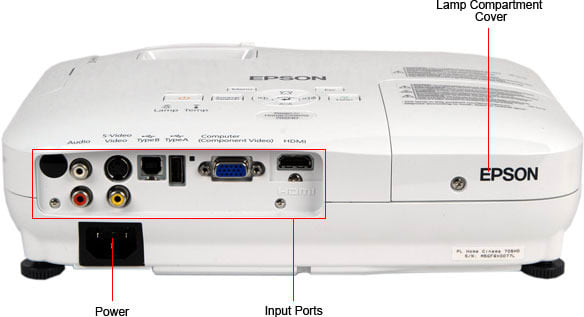
The input ports for this device are located in a single on the back of the projector. There are a lot of ports here, which allows a lot of different devices to be connected at once, including two VGA, one HDMI and one S-Video input.
Lots of cables are included
All the ports are listed below, compared with the competition.
Other Connections
{{section_header}}{{section.name}}{{/section_header}}
A single USB type A port and an Ethernet port are also present. These allow the PJD6531w to be connected to both a PC and the Internet for control purposes. However, there is no USB port for connecting thumb drives and other storage devices, and no memory card ports. There is also an RS-232 serial port which can be used to control the projector remotely.
Placement
{{section_header}}{{section.name}}{{/section_header}}
The location of the ports is fine for most uses, but the ports are a little closer together: if you use VGA cables with large plugs, you don't get a lot of room around them to remove the screws that hold them in. Likewise, the Ethernet, USB and HDMI ports are jammed together on the left side, which could be a squeeze if you need to frequently plug in and remove cables.
Internet & Media Features
Menus & Manual
{{section_header}}{{section.name}}{{/section_header}}
The menu button on the projector body or the remote accesses the on-screen menu, which provides access to all of the settings. This has a pretty straightforward structure, with the settings being divided into a number of sections, such as Picture, Image, Settings, Option, Network, etc. This creates a pretty logical structure that makes it easy to find the more commonly used features. However, some options are buried rather deeply within the menu structure. To turn BrilliantColor on or off, for instance, takes 15 button presses.
A rather basic printed Quick Start guide is supplied with the projector, with a more in-depth manual on the included CD as a PDF. Both manuals explain the features of the projector with a good level of detail and provide plenty of illustrations.
Noise
{{section_header}}{{section.name}}{{/section_header}}
We found the PJD6531w to be in the middle of the range when it comes to the noise it produces: it is not the quietest projector we've tested, or the noisiest. The noise is loudest at the left of the projector body (looking from the front) because of the large exhaust fans just inside the camera body that pull the air through the projector body, but we measured the overall average sound level at about 46.5 dB. Running the projector in the ECO mode reduces the noise level somewhat because the fans run slower: we measured the noise level here at about 44.4 dB.
Heat
{{section_header}}{{section.name}}{{/section_header}}
The PJD6531w uses air to cool the hot internal components of the projector (such as the lamp), and this hot air is vented out of the right side of the projector body. We measured the difference between the air going in and coming out at a rather warm 110 degrees Fahrenheit (about 43 degrees Centigrade) in normal mode, or 104 in ECO mode. That is a big difference, and means that you definitely feel it if you are the one sitting next to the projector in a crowded conference room.
Power Consumption
{{section_header}}{{section.name}}{{/section_header}}
The PJD6531w uses quite a lot of power: we measured the power consumption in the brightest mode at about 300 watts. If you were to watch about 5 hours a day of TV, that would translate into an annual running cost of about $58.91 a year.
Changing the image mode of the projector didn't make a lot of difference: we found that all of the modes used about the same amount of juice, including if the BrilliantColor feature was turned on or off. The only thing that reduced the power draw was engaging the ECO mode that reduces the brightness of the lamp. This reduced the power draw to about 244 watts, which would cost about $47.78 a year to run.
Lamp Life
{{section_header}}{{section.name}}{{/section_header}}
The lamp fits into a compartment at the front of the projector body. ViewSonic claims a 4000 or 5000 hour lifespan for this (in normal and ECO mode respectively) and a replacement bulb will cost about $240.
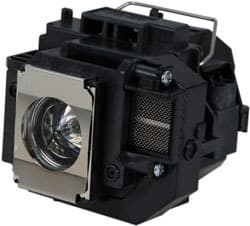
The lamp of the 705HD
Value
{{section_header}}{{section.name}}{{/section_header}}
Both projectors are available for about $700, so the question of value is more about what you prize most: the portability and brightness of the Epson, or the color performance and extra connectivity of the ViewSonic.
Blacks & Whites
{{section_header}}{{section.name}}{{/section_header}}
Both projectors can crank out a lot of light, producing upwards of 2700 lumens in their brightest modes.
{{image_chart title="Contrast", attachment="Contrast Graph"}}
Color
{{section_header}}{{section.name}}{{/section_header}}
The PJD6531w was the top scorer in our color performance tests, doing a better job of rendering fine color changes when properly calibrated than the Epson. You can see this in the color gradients below: the ViewSonic looks smooth, while the Epson has serious banding.
Motion
{{section_header}}{{section.name}}{{/section_header}}
Both projectors did a decent job of rendering smooth motion, but we found that the ViewSonic motion looked a little smoother and more natural. The ViewSonic does share the same rainbow effect issue that most DLP projectors have, where a color fringe can be seen on some fast moving objects.
Viewing Effects
{{section_header}}{{section.name}}{{/section_header}}
Both projectors provide a good amount of flexibility in where they can be placed, and both have the power to fill a good sized screen in a dark or dimly lit room. Neither has the power to cut through a lot of ambient light, though, so they would not work in a well-lit room or would not work adequately on a large screen.
Connectivity
{{section_header}}{{section.name}}{{/section_header}}
Both projectors have the basic connections that are required for everyday use, with HDMI, VGA and analog video inputs. The ViewSonic has the advantage of offering multiple VGA inputs, which could be useful if you are looking to connect multiple devices to a single projector. Both only have one HDMI port, though, so you will need to add a HDMI switch if you want to connect more than one device to either.
Value
{{section_header}}{{section.name}}{{/section_header}}
Both projectors are equally priced at around $700, so the choice comes down to which set of features you prefer: the portability and color accuracy of the Optoma HD66, or the brighter, bigger and better connected ViewSonic PJD6531w.
Blacks & Whites
{{section_header}}{{section.name}}{{/section_header}}
The ViewSonic produces more light: we measured its output at just over 3100 lumens, while the Optoma maxed out at around 2700 lumens. That isn’t a huge difference, but the extra lumens do make the ViewSonic more viewable in anything other than dim light.
{{image_chart title="Contrast", attachment="Contrast Graph"}}
Color
{{section_header}}{{section.name}}{{/section_header}}
The Optoma had slightly better color performance, with more consistent color temperature and smoother color response curves. The latter means it does a slightly better job of representing the subtle changes that real world images contain without creating banding.
Motion
{{section_header}}{{section.name}}{{/section_header}}
Both projectors use DLP projection systems, which means that they both show the DLP rainbow effect, where fast-moving objects show an occasional color fringe in alternating colors, producing a rainbow effect that can be somewhat distracting. We found that the ViewSonic seemed to show this effect more often.
Viewing Effects
{{section_header}}{{section.name}}{{/section_header}}
The ViewSonic is the more flexible projector, with a longer zoom range that provides more flexibility in where the projector can be placed. The Optoma has only a small 1.1x zoom, which only gives it a few inches of flexibility to move forward and backward.
Connectivity
{{section_header}}{{section.name}}{{/section_header}}
The Optoma is somewhat limited in what connections it offers, with just 1 HDMI port and a single VGA port. The ViewSonic has two VGA ports and a VGA output, which allows you to daisy chain together two projectors.
Value
{{section_header}}{{section.name}}{{/section_header}}
The ViewSonic PJD6531w is the cheaper of the two projectors at about $700. However, the Canon LV-8310 is easier to use.
Blacks & Whites
{{section_header}}{{section.name}}{{/section_header}}
Both projectors are powerful devices that can output a lot of light. We measured the lumen output of the ViewSonic at just over 3100 and the Canon at 2500. However, the ViewSonic relies on the BrilliantColor mode to boost the brightness, which has an adverse effect on the color accuracy of the projector.
{{image_chart title="Contrast", attachment="Contrast Graph"}}
Color
{{section_header}}{{section.name}}{{/section_header}}
Both projectors had strong color performance in our tests, with the ViewSonic having more consistent whites and the Canon having smoother color curves. However, the Canon can produce brighter color, as you have to disable the BrilliantColor on the ViewSonic to get the best color accuracy.
Motion
{{section_header}}{{section.name}}{{/section_header}}
Both projectors produced acceptably smooth motion, although, like all DLP projectors, the ViewSonic was somewhat prone to the rainbow effect, where fast-moving objects get an occasional color fringe.
Viewing Effects
{{section_header}}{{section.name}}{{/section_header}}
Both projectors offer a 1.2x zoom lens, but the Canon offers a wider range of distances that it can be mounted from the projector, making it more flexible for office and other non-permanent installation use. We did find that the ViewSonic produced a slightly sharper image, though.
Connectivity
{{section_header}}{{section.name}}{{/section_header}}
The ViewSonic has one thing that the Canon does not: a HDMI port. This makes it easier to connect the ViewSonic to consumer electronics such as Blu-ray players. The Canon offers a DVI port in its place, which makes it easier to connect to a computer. Both projectors offer VGA and a variety of analog video and audio inputs, though.
Conclusion
The PJD6531w is a bright projector that doesn't compromise on performance: we found that it did a good job displaying both video and still images. The images it produced were bright, and the projector had good color accuracy when calibrated. The wide variety of modes it offers means that it can work in a variety of situations. However, it is a little large for portable use, and it generates a fair amount of noise and heat.
Meet the tester

Richard Baguley is a veteran writer who has written about technology ranging from Alphabet to Zip file utilities. He has contributed to pretty much every major tech publication, including Amiga Format Magazine, PC World, Wired, CNET, Toms Guide, Forbes, and many others. He lives in the Boston metro area with his wife, dog, and an indeterminate number of cats.
Checking our work.
Our team is here for one purpose: to help you buy the best stuff and love what you own. Our writers, editors, and lab technicians obsess over the products we cover to make sure you're confident and satisfied. Have a different opinion about something we recommend? Email us and we'll compare notes.
Shoot us an email