
Introduction
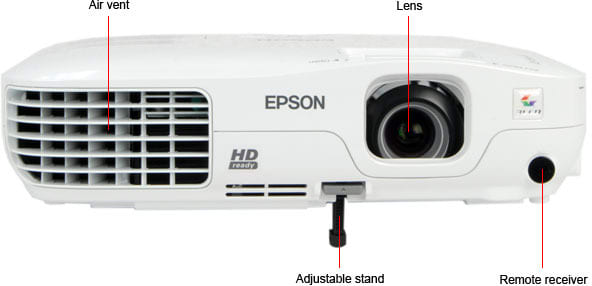
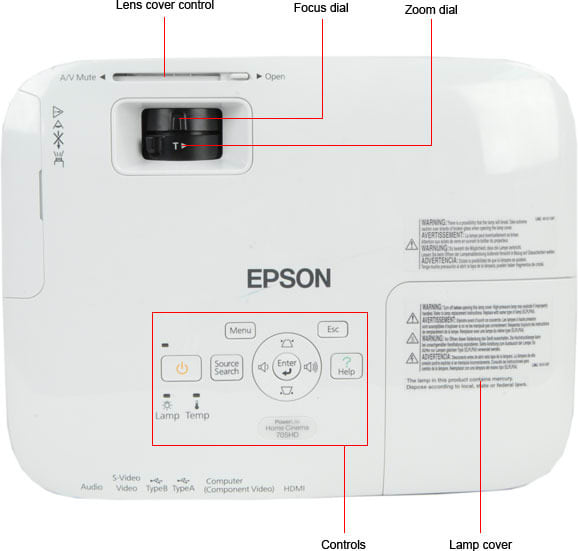
Front
{{section_header}}{{section.name}}{{/section_header}}
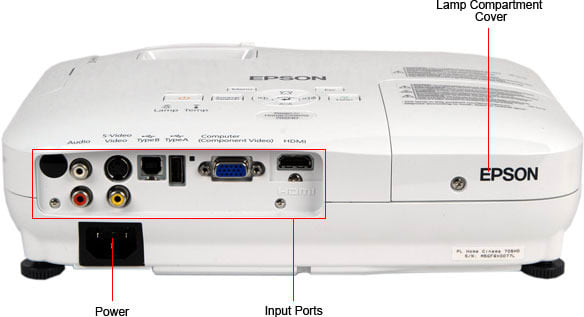
Back
{{section_header}}{{section.name}}{{/section_header}}
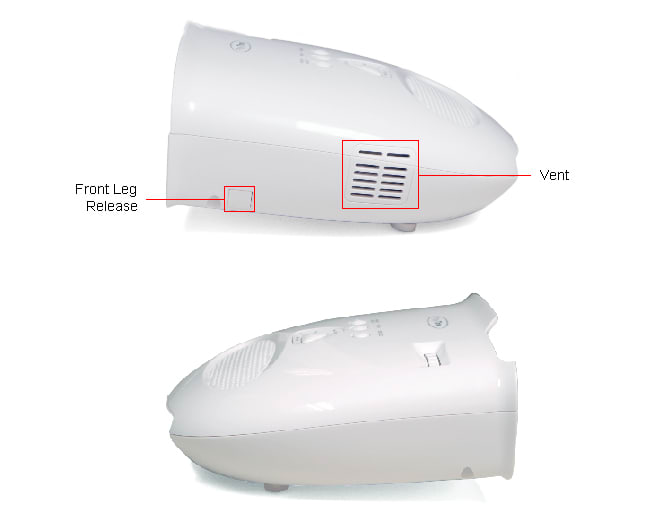
Sides
{{section_header}}{{section.name}}{{/section_header}}
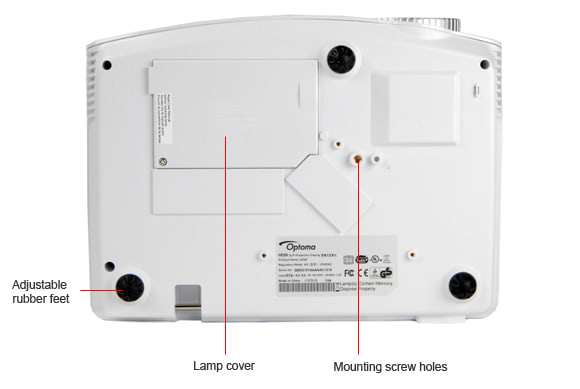
Top/Bottom
{{section_header}}{{section.name}}{{/section_header}}
Remote Control Tour
{{section_header}}{{section.name}}{{/section_header}}
At first glance, the remote control looks normal with up, down, left, right arrows, an x and an o button for cancel and accept respectively. Nope, not at all. Each of these buttons corresponds to an option in a three by two table, very rarely having anything to do with directional buttons. The square button below this misleading array is most commonly used for the cancel button, but this changes depending on the menu screen you are using.
On the bright side, there are not that many options so the buttons cannot be that confusing, and the remote is light and easy to handle.
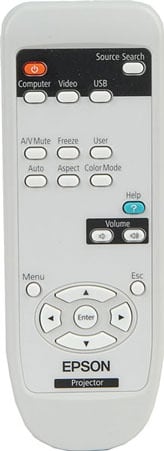
The small remote control of the 705HD
In the Box
{{section_header}}{{section.name}}{{/section_header}}
This pico comes with quite a bit of extra connectivity right in the box. There are included VGA, USB, and AV cords as well as a power wall adapter, a rechargeable battery, and a padded carrying case.
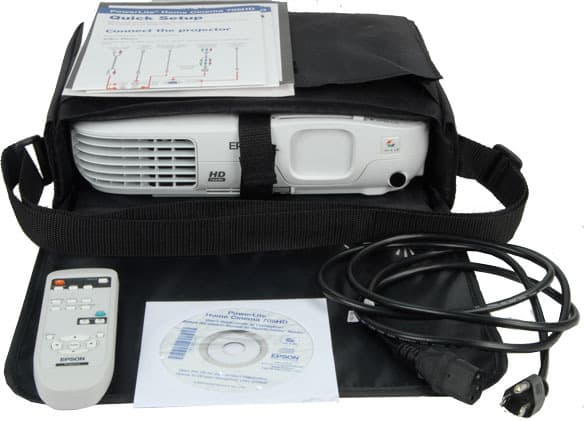
The 705HD comes with a carrying case, manuals, power cable and remote
Portability
{{section_header}}{{section.name}}{{/section_header}}
The {{product.name}} is the smallest and brightest pico in our series of four we just tested. Measuring 4.72 inches long, 2.76 in width, and 1.18 in height, this projector can fit in a jacket pocket for super-spy-like quick presentation of confidential documents (this is how we picture our work here at Reviewed.com).
{{product.raw_scores['Portability']}}
Setup Assistance
{{section_header}}{{section.name}}{{/section_header}}
Setup was fairly easy, although it came with no auto setup functions which is how we add points to this score, but it required minimal amounts of angle adjustments for that almost perfectly squared-off picture. There is some measure of upward projection to the picture. Some of these picos need to be projected directly at the center of the screen or section of wall to show an unwarped picture, which does not make sense to us. There are very few occasions where projecting from the middle height of the screen is possible. Generally, you will have your device set up beneath the projector looking up. We appreciate the built-in adjustments on this Optoma model.
{{product.raw_scores['Setup']}}
Aesthetics
{{section_header}}{{section.name}}{{/section_header}}
Optoma designed this projector with a gray rounded casing, lending it a very crafted feel. Other picos feel like all the features were slapped on to a rectangular object and as soon as they all fit, the design was done. The {{product.model}} is a tight little package with some good looks to boot.
Peak Brightness
{{section_header}}{{section.name}}{{/section_header}}
{{image_chart title="Peak Brightness", attachment="Peak Brightness Graph"}}
You can see in the comparison chart that the {{product.name}} is the brightest pico of the four we tested together. This luminance, though still quite dim by home theater projector and television standards, is getting to be bright enough to be seen clearly with moderate amounts of ambient light. For smaller projections, the {{product.model}} can be used in most lighting settings. We tried it out on the cubicle wall - er, corner office wall - and it was not washed out by the overhead lights or the bright daylight.
Peak Brightness
Tunnel Contrast
{{section_header}}{{section.name}}{{/section_header}}
This graph looks crazier than it really is. We measure to see if the black level gets brighter as we decrease the area of black on the screen. Ideally, the black level should stay consistently dark, rather than increasing in luminance. Usually, projectors have a hard time with this test, the black level getting significantly brighter as the area decreases. What we see in the chart below is an increase in luminance, but nothing so significant.
Tunnel Contrast
Uniformity
{{section_header}}{{section.name}}{{/section_header}}
We test the luminance at nine different spots on the screen to see how well a projector displays a consistent picture. You can see in our chart here that the {{product.model}} had trouble with the left side of the screen, showing a little more than a 40% decrease in luminance on that whole side. The right side fared better however. Subjectively, we could see that the left side was definitely dimmer than the right, but we did not notice this until we took our readings and made a point of looking for it.
Uniformity
Greyscale Gamma
{{section_header}}{{section.name}}{{/section_header}}
This gamma graph has a rocky start to be sure, but then it evens out to show almost perfect detail along the grayscale. The graph in the chart below represents the exact gray value displayed for a given gray value input. Ideally, the line should be straight, with a slope of 2.1, which would indicate perfect reproduction of an input signal.
The up and down nature of the graph at the left side shows an inability to reproduce the input signal. Each peak tells us that the gray value displayed was too bright for the given input, and each valley means that the displayed value was too dim. From this data, we see that the {{product.name}} cannot show certain gray values at the dark end of the spectrum. The straight and smooth line thereafter shows that the middle gray and bright white values have excellent distinction and detail.
Greyscale Gamma
Color Temperature
{{section_header}}{{section.name}}{{/section_header}}
Towards the dark end of the brightness spectrum, the color temperature strays towards the cooler side. This means that dark gray and black values may have a blueish tint to them, but at this low luminance, you should not see anything, let alone some minor tinting. This cooling is very slight and should not be considered a detriment.
Color Temperature
RGB Curves
{{section_header}}{{section.name}}{{/section_header}}
These color curves show how well a projector can reproduce the three primary colors along the brightness spectrum from dark to light. The curves you see in the chart below would be ideal if not for the green values.
If you look at the red and blue lines, you see two smooth curves that reach from 0 to 100% luminance, in even transitions. The green line is quite different, starting out way too bright and finishing at not quite bright enough. Furthermore, throughout the spectrum, there is up and down motion to the graph, showing an inability to reproduce brightness values of green. These bumps show a shift from too bright to too dim, never reproducing green at the correct brightness for the given input signal. Oh well, at least the red and blues will look strong.
RGB Curves
Color Gamut
{{section_header}}{{section.name}}{{/section_header}}
Where's all the saturation!? Previously, we saw problems only with the green values in terms of luminance value reproduction, now we see that the green colors are the only accurate ones when matched up to the Rec. 709, the international standard for HD colors. The red and blue colors are drastically undersaturated.
We even retested the colors using the expanded color range, and found that this adjustment did not help the situation, rather the gamut errors were slightly greater than using the standard color range. The biggest difference was an inconsistent color temperature, so we recommend leaving the color range on standard.
Combining the knowledge we have, the green colors are accurate, but transition from dark to light poorly. The red and blue values are not quite red and blue, but have great brightness reproduction across the spectrum. The mixture of these benefits and deficits makes for an odd set of colors, but a picture that is actually watchable in our regard. You may notice that something is not quite right, but you may also be lulled into watching a strong picture by how good the colors look in relation to one another on screen.
Color Gamut
Motion Smoothness
{{section_header}}{{section.name}}{{/section_header}}
We saw some of the usual loss of detail in motion. Faces became slightly blurry, and tight lines melded together. We noticed some colors trailing, leaving remnants of the past frame on the screen, but really none of these defects were strong enough to warrant scribal spite.
Motion Artifacting
{{section_header}}{{section.name}}{{/section_header}}
The artifacting deficits were much the same as those recorded in the smoothness section. We saw the usual warping of rectangular objects and the inclusion of jagged edges on moving pictures. These are results of a slow processor unable to correspond the motion of an object with the refresh rate of the projector, thereby moving the object in parts, rather than the entirety of the object at the same time. Again, what we saw here was no better or worse than the usual display or projector.
Resolution Scaling
{{section_header}}{{section.name}}{{/section_header}}
The {{product.name}} can show 720p and 1080i video through the HDMI connection. You can only get 720p out of the VGA connection as the resolution max through the VGA is 1280 x 800.
We tested the 720p through the VGA cable and found the resolution performance lacking. All of the high density moire patterns banded together, text was blurry and only readable at higher font sizes, and many of our high contrast patterns were not properly rendered.
Throw
{{section_header}}{{section.name}}{{/section_header}}
None of these pico projectors have a zoom lens, which means they will receive a throw score of zero.
Screen Brightness
{{section_header}}{{section.name}}{{/section_header}}
Though the {{product.name}} was the brightest pico we tested, we cannot really suggest that it will be useful for displaying a 140-inch screen. The front page of the marketing specs state that you can fit a 150-inch presentation in your pocket, but we will have to disagree. Yes, it is possible to project a screen that large, but with less than 11 lux, even slight ambient light should overcome such a weak projection. Our screen is 80 inches, and with the lights turned off, 35 lux was great. With the lights on, we could still make out what was on the screen, but you wouldn't want to rely on it for a presentation. Increasing the size of the screen by almost double, having to move the projector back about 8.5 feet, thereby dimming the picture by 60%, we cannot imagine that the {{product.name}} will satisfy most, if any, 150-inch screen situations.
Optical Issues
{{section_header}}{{section.name}}{{/section_header}}
We saw some definite bowing of the picture along the topmost edge, though the other three edges were straight. With three straight edges, there is nothing to do, no angle to adjust, to correct the fourth. Other than that, the pixels were very sharp, and there was little pixel bleed, relatively of course. Pico projectors currently do not have the definition and focus of which home theater projectors are capable. This is one of the many reasons we do not recommend pico projectors as a replacement for a home theater setup, but we find them useful for any number of niche situations, and we are sure consumers can find all sorts of utility for a pico.
Formats
{{section_header}}{{section.name}}{{/section_header}}
The best we could do was output a 720p picture from the VGA cable. If you have the optional HDMI cable, you can project 720p and 1080i pictures handily.
Calibration
{{section_header}}{{section.name}}{{/section_header}}
You have the ability to adjust the contrast, brightness, gamma, color range, and the LED power mode. Finding all of these modes in one place is a challenge however. You can access them by hitting the circle button when you are engaged in a piece of content, or you can get to about half of these settings in the main menu. The gamma setting is only in the main menu, and not on the content menu.
We used the highest LED brightness mode instead of movie mode because it had the most accurate color temperature, right around 7000K. We adjusted the contrast up three notches, and the brightness down one notch for best picture quality. We left the gamma where it was and the results were fantastic.
We tend to leave color range at standard because it usually oversaturates the colors like woah. However, on our first color test, we saw that the red and blue values on the gamut were significantly undersaturated and decided to give the expanded color range a chance. This served only to make the color temperature highly erratic and somehow caused it to score worse on the color gamut accuracy. It's best to leave the color range alone.
Video Modes
{{section_header}}{{section.name}}{{/section_header}}
There are no video modes on the {{product.name}}.
Input Ports
{{section_header}}{{section.name}}{{/section_header}}
We would like to loud the port connections on the {{product.name}}. We like to see the microSD card slot, the mini-USB, and mini-HDMI ports. The {{product.model}} can support a 720p or a 1080i picture through the HDMI port. The AV input connector can hook up any of the classic L,R,Video analog devices through its AV adapter port. The USB port allows for direct file transfer to the 2GB internal memory.
Then there is the Universal port, which can connect to a host of different devices. The {{product.model}} comes with a Universal to VGA connection, which is great for mirroring a computer display. This Universal port has an optional accessory to make it compatible with Apple devices.
We feel that Optoma has covered the gamut of connections you would want to make with this projector. It is not to be the hub of your entertainment system, so doubling up on HDMI ports or anything else for that matter would be superfluous. Rather the {{product.model}} is a versatile presenting device, able to connect with anything (most things), anywhere, in a range of light settings.
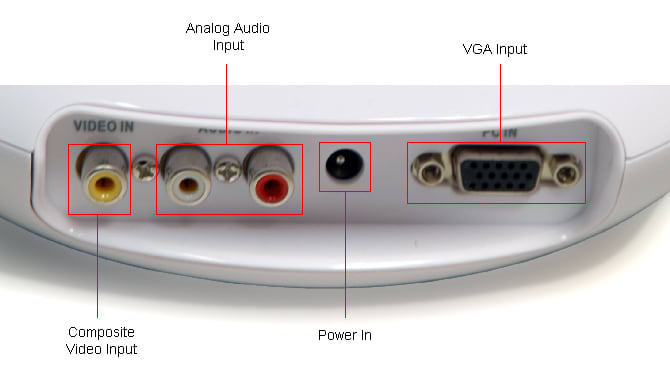
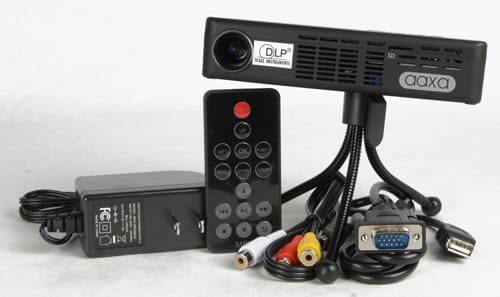
Lots of cables are included
All the ports are listed below.
Placement
{{section_header}}{{section.name}}{{/section_header}}
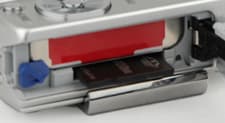
All of the ports are laid out along the back, with enough space that you could have a couple of different devices hooked up at the same time. The micro SD card slot is on the side
Menus & Manual
{{section_header}}{{section.name}}{{/section_header}}
The electronic manual is detailed with great pictures and descriptions of the various ports and functions. There is an extensive written discussion about how to access files, choose formats, and different memory inputs. You will not miss a thing with this helpful guide.
The hard copy of the manual that comes in the box is not as helpful. It is more of a poster than anything else, and it only describes things like how to plug in the adapter to a wall outlet. You know, like how you plug anything with a cord into the wall. Yes, they show you that, in fifteen different languages. They also locate the power button for you.
If you need to actually figure something out, look at the digital manual found here.
Noise
{{section_header}}{{section.name}}{{/section_header}}
Extra noise is not really a concern with pico projectors, particularly with the {{product.name}}. An increase of about 10dB is not much to consider.
{{image_chart title="Noise", attachment="Noise Graph"}}
Heat
{{section_header}}{{section.name}}{{/section_header}}
At its brightest, the {{product.name}} shoots out exhaust air that is 45ºF hotter than the ambient texture. At minimum brightness, the exhaust air is only 6ºF hotter than room temperature. This is a pretty big difference, but 45º will not limit your use, only keep in mind that you should leave some room around this projector to keep it from overheating itself.
{{image_chart title="Heat", attachment="Heat Graph"}}
Power Consumption
{{section_header}}{{section.name}}{{/section_header}}
Somehow, the {{product.name}}, the brightest of our picos, costs the least to operate. Interesting, perhaps, but is the difference of less than a dollar per year going to affect your annual budget? We find that unlikely.
{{image_chart title="Power Consumption (modes)", attachment="Power Consumption Modes Graph"}}
{{image_chart title="Power Consumption (calibrated)", attachment="Power Consumption Comparison Graph"}}
Lamp Life
{{section_header}}{{section.name}}{{/section_header}}
The {{product.name}} uses long lasting LEDs to project a picture. This particular model is tested for 20,000 hours of continuous use. We did not have the time to do this longevity testing, as we would have had to work nonstop for over two years before producing this one review. We weighed the costs and benefits of doing so and after much deliberation, decided to forgo such brutality.
Optoma does not offer LED replacement. Proper disposal is expected after the lights finally fade, after faithful years of bringing brightness to our world.
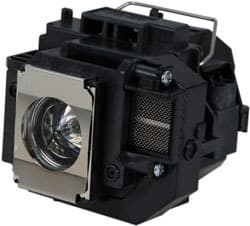
The lamp of the 705HD
Value
{{section_header}}{{section.name}}{{/section_header}}
We peg the {{product.name}} as the pico projector to beat. The AAXA P4 has quite a few good features, but can't match the quality, the size, or the versatility of the {{product.name}}. Specifically, the sterling peak brightness of the {{product.name}} has to be counted as one of the most important specs, as well as having an HDMI connection. Yet, even on the finer points, like grayscale and color quality, the {{product.name}} is a better device. At this price point, the extra $30 is negligible and pays for a high margin of quality.
Blacks & Whites
{{section_header}}{{section.name}}{{/section_header}}
The {{product.name}} was the brightest pico we tested, and it also had the best gamma graph, showing the most detail across the grayscale.
{{image_chart title="Contrast", attachment="Contrast Graph"}}
Color
{{section_header}}{{section.name}}{{/section_header}}
The {{product.name}} had a more even color temperature, better color transitions, and a more accurate color gamut than the AAXA P4.
Motion
{{section_header}}{{section.name}}{{/section_header}}
In our motion tests (one of our only subjective tests) the AAXA P4 appeared to retain detail in motion better than the {{product.name}}, but they were very similar in their abilities.
Viewing Effects
{{section_header}}{{section.name}}{{/section_header}}
Both the AAXA P4 and the {{product.name}} had difficulties with bowing on the top edge of the picture. The distortion was minimal in both cases.
Connectivity
{{section_header}}{{section.name}}{{/section_header}}
The AAXA P4 has a great set of connections, but the {{product.name}} has everything the P4 has as well as that mini-HDMI connection that really takes the cake for versatility.
Value
{{section_header}}{{section.name}}{{/section_header}}
The Aiptek V50 is still under evaluation, and much of our data is incomplete as of yet. Even so, the {{product.name}} has the Aiptek V50 beat in peak brightness, some color accuracy, and port variety. Without some standard ports, the Aiptek V50 is not going to be that useful. There is a price difference between these two. The {{product.name}} sells for $130 more than the Aiptek V50. It's hard to determine at this point without complete testing data, but we are confident in saying that the {{product.name}} is worth the extra money.
Blacks & Whites
{{section_header}}{{section.name}}{{/section_header}}
Peak brightness is one of the data points we were able to record for the Aiptek V50, and we find that it did not match the high luminance of the {{product.name}}. Further, we hypothesize that the shadow detail on the Aiptek V50 cannot match that of the {{product.name}}, which was very strong.
{{image_chart title="Contrast", attachment="Contrast Graph"}}
Color
{{section_header}}{{section.name}}{{/section_header}}
We can compare the color gamuts on both of these projectors. The Aiptek V50 had a very sad and strange color gamut, that did not match any of the three primary colors or the white point. The {{product.name}} is, relative to this comparison, incredibly accurate.
Motion
{{section_header}}{{section.name}}{{/section_header}}
As we are still testing the Aiptek V50, we cannot give you a reading on its motion processing. The {{product.name}} was very average here: not bad, not great.
Viewing Effects
{{section_header}}{{section.name}}{{/section_header}}
We saw slight bowing of straight lines near the top of the picture with the {{product.name}}, but nothing serious. We are still waiting to see what the Aiptek V50 has to show us.
Connectivity
{{section_header}}{{section.name}}{{/section_header}}
The Aiptek V50 is lacking an HDMI and a VGA connection. These are two important ports for presentations and general compatibility. We were quite satisfied with the port selection on the {{product.name}}, and if you plan to use your pico projector in a number of settings, a variety of ports will help.
Value
{{section_header}}{{section.name}}{{/section_header}}
We like this comparison because it shows two different types of pico projectors. On one side we have the 3M MP225A, a relatively inexpensive, one-plug setup intended mainly for Apple devices, with no menu system or settings to control whatsoever. It shoots out some great colors but it does not get that bright. On the other side, there is the {{product.name}}, a tiny pico with great connectivity, shining brighter than any of the picos we tested, showing some great shadow detail, with reasonable colors, but costing a pretty penny (actually thousands of pretty pennies).
We see the 3M MP225A being used casually, for people who want to buy into the pico generation of projectors without too much of an investment. You could use it professionally, but if you are serious about having a pico for regular professional use, the {{product.name}} costs a little more, but has the breadth of port connections, internal memory, and brightness you need for use in any situation.
Blacks & Whites
{{section_header}}{{section.name}}{{/section_header}}
The {{product.name}} is almost twice as bright as the 3M MP225A. We'll take it.
{{image_chart title="Contrast", attachment="Contrast Graph"}}
Color
{{section_header}}{{section.name}}{{/section_header}}
The {{product.name}} had better color curves, showing smoother transition along the brightness spectrum, but the 3M MP225A had a better color gamut.
Motion
{{section_header}}{{section.name}}{{/section_header}}
The 3M MP225A had some really bad artifacting problems, showing images wobble in sections across the screen instead of moving as one piece. The {{product.name}} did not wow us with its motion processing, but it did not pain our eyes either. We like the {{product.name}} in this contest.
Viewing Effects
{{section_header}}{{section.name}}{{/section_header}}
The 3M MP225A showed a little more bowing of straight lines and some blurring of pixels than did the {{product.name}}.
Connectivity
{{section_header}}{{section.name}}{{/section_header}}
This is an outrageous comparison. The 3M MP225A only comes with one proprietary Apple connection, with the option for VGA, and the {{product.name}} had the largest breadth of ports we saw on a pico so far. If you need to connect to a bunch of devices, the {{product.name}} is the way to go. If you have an iPhone, iPad, and an iPod, you may very well want to consider the 3M MP225A, but know that only certain apps can project a picture.
Conclusion
The {{product.model}} ($429 MSRP) is a pocket-sized projector from Optoma. It's a bit pricey for a pico projector, considering a 1080p home theater projector starts at about $200 more, but we say it's worth the extra coin.
There's a lot to like about this projector. It's best quality is the peak brightness we recorded at 62.24 cd/m2, which topped the rest of our pico lineup. This will make it versatile in a range of settings, which we assume is the point of micro-sized projectors. Further adding to the versatility, is a list of connections that is pretty impressive: HDMI, VGA, AV, and micro SD as well as 2GB of internal memory. You could appear in just about any presentation room with just the {{product.name}} and be ready to show off what you got.
Not just for presentations, the {{product.model}} could be used reasonably well for projecting a movie or a video game console. The connections are there, and the picture is rather good, considering the strong detail across the grayscale spectrum, and good color accuracy. If you have a dark room, a white wall, and the HDMI cable, we think movie night is on.
We would like to note some drawbacks. The menu system was designed by someone who thinks completely differently than anyone else. A series of shapes gets you through a few menus until all of a sudden, the menus change and the buttons mean completely different things. It's wacky. Also, the left side of the projection, on our particular model, is significantly dimmer than the middle and the right. We didn't notice this drawback until we took our uniformity readings, but now it's hard to unsee. Then there's the color gamut, which was not all that colorful, being largely unsaturated in both red and blue values.
All together, if you are looking for a quality pico, we say this projector is the way to go. There are cheaper, more accessible models for the casual user, but for that important presentation, or the informed gadget geek, the {{product.name}} is what you want.
Meet the tester
Christian Sherden is a valued contributor to the Reviewed.com family of sites.
Checking our work.
Our team is here for one purpose: to help you buy the best stuff and love what you own. Our writers, editors, and lab technicians obsess over the products we cover to make sure you're confident and satisfied. Have a different opinion about something we recommend? Email us and we'll compare notes.
Shoot us an email